

Self-supporting Standing (knitted) Horse”= Games with 5 needles
 Here you go!
So that everyone can profit from my hard work, I have written up a tutorial for how you make my little horse that stands up, all on his own!
Here you go!
So that everyone can profit from my hard work, I have written up a tutorial for how you make my little horse that stands up, all on his own!
A word of warning though: My tutorial is not very precise (a bit like me really...) and it might get a bit hard to follow at times.... you have been warned!


Equipment
Iron wires (like a wire coat-hanger)
2 or 3 balls of wool of your choice – this is very much up to you, and the wool / needle combination that you use will make a different sized horse.
5 DPNsof a size that knit a nice firm fabric using your wool (you will need to swatch and figure it out for yourself.)
A big bag of patience!
Colour:
This is entirely up to you, depending on how you want your horse to end up!
Stitch used throughout
Stocking stitch or garter stitch, entirely up to you, as long as you get a firm fabric at the the end!
Let’s Go!
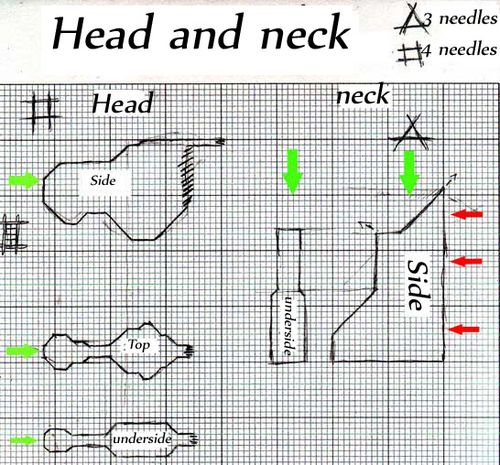
Right! We’ll start with the muzzle (the green arrow) with your 4 DPNs and following the chart.
Example
Little by little as the knitting grows, thread your first iron wire in and bend / fix it so it gives you a horse shape!
The support has to run the length of the back, right to the end of the tail!
Once the head is finished, leave the stitches from under the head on a stitch holder, you’ll use them later….
Now cast on the neck with three needles from the start (the green arrow). On the underside of the neck (the red arrow) insert a length of yarn every couple of rows and tie up (fingers crossed, it doesn’t come untied! ).
Once the neck is finished, thread it onto the support for the back and sew it onto the head.
Stuff the neck so that the support runs under the horse’s mane.
Watch out! Don’t over-stuff your toy, if you do, you’ll get holes and that is really not pretty!!!
Is that it? Am I done?
Nope! You’ve only just started!
Come on ! Back to work!

The next bit:
Oh goody! Before doing anything else, take two long bits of iron wire. Fold the first piece in two, if the length is good, roll up the end onto the backbone which runs through the legs. This folded piece will become the front legs.
Another example
Do the same for the back legs!
Now start the neck (the black arrow) with the opening smaller at the top, knitting around the wire (You’ll see, you’ll know what I mean!LOL!).
Follow the chart...
When you get to the level of the legs, put the stitches for the front of the horse onto a holder.
When you get to the size that you want, cast on the same number of stitches as you put onto the holder (make sure that the wire that holds up the leg is in the middle of the hole...) then follow the chart. Repeat this for the back legs.
Remember to stuff as you go, and little by little, it gets there… pah !Are you listening to me? I think a couple of you have wandered off and aren’t listening any more!!!
When you reach the tail, do what you did for the neck (follow the red arrow, of course!)
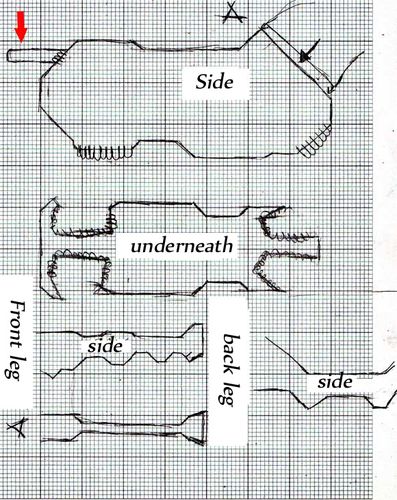
The leg is a little harder : Pick up the stitches from the holder and from the two sides!

exemple
Kit around the iron wires and stuff as you go, little by little….
And there, I’ll let you attack the stitches… good luck!
No, I’m kidding… LOL!
At the end of the hoof, don’t forget to sew it up tightly, otherwise, who knows what might happen!
And then ? Is that it ? Done?
Yes !!! Congratulations!!!

If you have actually managed to follow this tutorial, it would really please me if you send me a photo of the results!!! Tricoty@live.fr